Wednesday, September 26, 2012

Crock Pot Applesauce


This is truly what a part of my heart looks like for my children.  I love them for so many reasons and I show my love in many ways... food is one.  The other day, we visited our local farmer's market, and my children literally did a happy dance as we were buying local apples, knowing I was going to come home and make my crock pot applesauce for them, as I have done each year since my oldest was about 2 years old.  Believe me, other than my family, there is no one else I'd spend that kind of time preparing so many apples for such a small yield.  They inhale it!  But it's wholesome, healthy food that is creating a powerful memory and connection in them.  Maybe one day they'll look back on something as simple as this applesauce and remember it like this...
My Grandma's Snickerdoodles

Crock Pot Applesauce
24 apples (about -- enough to fill your crock pot almost to the top)
1/2 c. water
1/4 - 1/2 c. sugar (depending on natural sweetness of the types of apples you are using)
1/4 - 1/2 t. cinnamon (a little goes a long way)

Core, peel and chop your apples.  Pieces should be about the size of a small egg.  Place the apples, water, sugar and cinnamon in the crock pot and cook on low for 8 hours, stirring occasionally.  The apples will be soft enough to break with a spoon, and the mixture will reduce by close to half.  Let cool in crock pot insert on counter overnight.  Then transfer to an air-tight container and refrigerate for about 4 hours before serving.

Pumpkin Pancakes


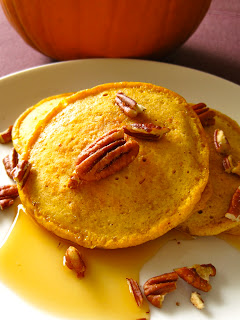
September 26 is National Pancake Day.  I'm not in the habit of knowing food holidays, but the date also happens to be my birthday.  Of all the food holidays I could have gotten, this is a pretty awesome one.  It's cake... in breakfast form!  Here's one of my all time favorite pancake recipes for you to enjoy.  I found roasted, salted pecan halves at Trader Joe's.  They are optional, but it's quite a nice combo with the sweet/salty thing going on.

If you'd like to find out what national food holiday your birthday falls on, visit Foodimentary.

Pumpkin Pancakes
2 1/2 c. flour
4 T. sugar
4 t. baking powder
2 t. cinnamon
1 t. ginger
1 t. salt
2 c. milk
3/4 c. canned pumpkin
4 T. melted butter
2 eggs

Whisk together dry ingredients (flour through salt) in a large bowl.  Whisk together wet ingredients (milk through eggs) in a smaller bowl.  Pour wet ingredients into large bowl with flour mixture.  Stir well to combine.  Cook pancakes on hot, well-greased griddle.

Recipe altered from original at
Sweet Peas Kitchen - Pumpkin Pancakes

Tuesday, September 25, 2012

Pumpkin Pie Coffee Creamer


So a girl cannot live by cafe mocha alone. Other flavors are necessary, especially with the arrival of fall and all things pumpkin in my house. I found a great homemade pumpkin coffee creamer recipe, which uses heavy cream and whole milk. But because I'm a little lazy, and cheap, I decided to use the same concept with my favorite Coffee Mate Sweet Cream Natural Bliss. It's the exact amount needed in the recipe (16 oz.), plus it's all natural - just milk, cream and sugar. I photographed the creamer in a recycled Frappuccino bottle (yes, from Starbucks), but I store the creamer in the original Coffee Mate bottle in the fridge. It will keep about a week in the and tastes best the day AFTER you've made it.   Mmmmmmmmmmmmm...

Pumpkin Pie Coffee Creamer
1 container Coffee Mate Sweet Cream Natural Bliss
4 T. canned pumpkin (plain pumpkin, not pie filling)
1 t. pumpkin pie spice
1 t. cinnamon
1 t. pure vanilla extract

Whisk together the creamer, pumpkin, pie spice and cinnamon in a small saucepan. Heat over medium heat, stirring occasionally until the liquid begins to steam. Remove from heat and stir in vanilla. Let cool and strain into a clean bowl. Then carefully pour the creamer back into the Coffee Mate container and store in the fridge. You will have a bit too much to pour it all back into the original container. Pour it into a smaller container.

Original Recipe from
Next to Heaven - Pumpkin Coffee Creamer

Saturday, September 22, 2012

Be Your Own Barista


It's a Saturday morning as I post this, and I'm drinking that cafe mocha in the picture. The best part about it? I only had to make the short walk to my kitchen to get it! Sure, it takes about 10 minutes from start to finish, but most of that is hands-off, and it's saved me the time it would have taken to pack myself and the children in the car to drive to Starbucks, not to mention the hefty price tag that comes with it.

My friend Diane was instrumental in helping me figure out how to make these at home.... so a big thank you to her! Brew your coffee in whatever way you normally would for this (traditional coffee maker, a Keurig, or French Press). Since I am the only coffee drinker in our house, I make mine in a Bodum French Press that I purchased at Target.  It takes about 4 minutes to heat the water in the microwave, and another 4 minutes to steep the coffee in the press. While I'm waiting for my coffee, I fix my breakfast. It's a great way to start the morning!

DIY Cafe Mocha
10-12 oz. fresh brewed coffee (depending on the size of your mug)
3-4 T. coffee creamer (I use Coffee Mate's Sweet Cream Natural Bliss - no artificial ingredients)
1 heaping teaspoon of Hershey's cocoa powder
1/2 t. sugar

Place the cocoa powder and sugar in the bottom of your coffee mug. Pour in the hot coffee, followed by the coffee creamer. Mix well. Top with your favorite whipped cream if you are in a fancy mood -- I happened to find toasted marshmallow whipped cream at our local grocery and it is lovely. Enjoy!

Thursday, September 20, 2012

DIY "Hot Pockets"


I purchase and eat some processed foods; Hot Pockets are not one of them.  If you are familiar with the comedian Jim Gaffigan, he does a very funny bit about Hot Pockets in his comedy tour "Beyond the Pale."  Wondering how they were created in the first place, he guesses a marketing guy was sitting there saying, "Hey, I got an idea, how 'bout we fill a pop tart with nasty meat!?" That sounds about right... If you are in need of a laugh, click on the link to watch the full clip....
Jim Gaffigan "Hot Pockets" on YouTube

So back to the food.  I found a recipe on Martha Stewart's website a while back for homemade "Hot Pockets" with chicken, broccoli and cheese.  I altered the recipe a bit, and they were delicious!  I hope you take the time to make some because they are well worth the effort, plus you'll have extras to freeze for later.

DIY "Hot Pockets"
1 T. vegetable oil
3 boneless, skinless chicken breasts
salt and pepper
Heat the oil over medium high heat until hot.  Dry chicken breasts with paper towels and season both sides with salt and pepper.  Add to hot skillet, and brown, about 4 minutes per side.  Turn heat to medium low, cover pan with lid and continue to cook until chicken juices run clear and the meat is tender when pierced with a fork.... about 10 more minutes.  Once cooked, remove chicken to a clean plate and tent with foil.

While chicken is cooking, prepare the rest of your filling...
6 c. fresh broccoli florets, cut into bite-sized pieces
6 oz. extra sharp cheddar cheese
6 oz. Gouda cheese
1/4 c. mayonnaise
1/2 t. garlic powder
1/2 t. onion powder
1/2 t. dill
1 t. salt
8-10 flour tortillas
Place broccoli in a large sauce pan.  Fill to about 1/2" below top of broccoli with cold water.  Cover and heat on high until boiling.  Tilt lid to let steam escape, reduce heat to medium high, and gently boil for about 3 minutes.  Remove from heat and drain broccoli in a large colander.  While chicken is cooling, leave broccoli in colander, set on top of the same pot you cooked it in, to make sure as much water drains as possible.

Shred both cheeses.  At this point, the chicken should be cooled enough to chop into bite sized pieces.  Place broccoli and half of the cheese in a large bowl and toss together.  Add mayonnaise and all the seasonings, mixing well with a spatula.  Add the chicken and rest of cheese, again, mixing well with a spatula.  Your mixture will look like this.....


Notice I took a picture of my tortillas.  If you can find a healthy wheat tortilla, or like mine which have 13 grams of fiber each, by all means, use them!
To assemble, place a tortilla on a clean flat surface and place 2/3 cup of filling in the center.  Fold the bottom  of the tortilla over the filling, kind of cupping it with your fingers to keep it from squishing out.  Fold both ends in, then roll the whole packet forward to seal.
Depending on the size of your chicken breasts, you will have enough filling to make 8-10 pockets.  To freeze, wrap each pocket in plastic wrap, then place them in a freezer-safe container.  When you want them for a meal, take the amount needed out of the freezer the night before and thaw in the refrigerator (not on the counter!)  Then proceed with baking instructions...
Preheat oven to 400 degrees.  Lightly spray surface of baking sheet, and tops of pockets with good-quality cooking spray.  Place pockets, seam side down, on the baking sheet.  Bake for 15 minutes.  Flip the pockets for the last 5 minutes of cooking, so the tops get lightly browned.

Here's the link to the original recipe...
Martha Stewart - "Hot Pockets"


Wednesday, September 19, 2012

Layered Salad

This is a "throw back" recipe.  I remember my mom making what she called a "Seven Layer Salad" when I was young. This one is actually nine layers, if you count the dressing on top. I found the recipe, story and gorgeous photos for this recipe (the one above IS mine that I made for a potluck recently) on "The Pioneer Woman's" blog. Her writing is so entertaining and she posts amazing photos of the step-by-step process for each of her recipes, so I'm just going to post the link to her recipe.

But of course I have to add, I made a couple of minor tweaks to her original...

First, she insists on seasoning both layers of greens (iceberg lettuce and baby spinach) with salt and pepper for enhanced flavor. While I see her point, salt draws the water out of fresh vegetables. This salad is meant to sit in the refrigerator for several hours before serving. I went ahead and followed her instructions, and I found the spinach especially to be on the way to mushy when I served the salad. So, I strongly recommend skipping the salt and pepper. The bacon and cheddar add plenty of salt!

Second, I added a tablespoon of balsamic vinegar to the simple dressing of sour cream, mayonnaise and sugar (I added 2 tablespoons of the sugar).  It just seemed like it needed a little extra "brightness" of flavor from the vinegar. This is personal preference!

So here's the link... enjoy the story, photos, and of course eating this delicious and beautiful salad!
The Pioneer Woman - Layered Salad

Saturday, September 15, 2012

School Lunches


At the beginning of the school year, I posted on Facebook that I'd stocked the pantry for kids' lunches, and several friends quickly responded that I should blog about school lunches.  So, here's my attempt on a topic that is exhaustive and exhausting.  Just like any mom I look for short cuts.  I always pack my son's lunch (my daughter is in half day Kindergarten so does not need a lunch yet), but even I resort to a store-bought Lunchable sometimes.  Pinterest can quickly make you feel inadequate, what with the thousands of pictures of too-cute-to-eat "bento box" lunches.  They exhaust me just looking at them.  So here's my take...

The above reference list is really all you need.  Here is the link for the original copy.  

Beyond that, I love the Ziploc brand, 3 compartment, lidded containers, because they inexpensively give a "bento box" feel. But I just as often pack with baggies in my son's lunch.

One thing I do find fun are the endless FREE printable lunch notes from the web, found on Pinterest or by doing a simple Google search.  They make me feel like a "Martha mom" (as in Stewart), when that couldn't be further from the truth!

So below, you will find a few pictures of lunches I've made, two quick recipes, and most importantly, the link to my Pinterest Lunch Box Board, which contains over 30 links to websites that will provide you with more ideas than you ever wanted for things to pack in your child's lunch and tons of lunch box notes.  Because really, there are so many other better photographed and already created lunch ideas out there, and I am just posting here to guide you to the ideas I've found and have used. Enjoy!  


"Kitchen Sink" Pasta Salad
8 oz. pasta (any shape)
8 oz. meat (I used Trader Joe's frozen turkey meatballs)
4 oz. cheese (I used string cheese, cut into small cubes)
2 c. fresh veggies (I used broccoli, carrots and kalamata olives)
1/2 c. mayonnaise
1/3 c. vinegar
2 T. sugar
1 t. salt

Cook pasta, drain well and rinse with cold water.  Toss with meat, cheese and veggies.  Whisk together mayo, vinegar, sugar and salt.  Toss with pasta salad.


Turkey Roll-Ups
One tortilla
Hummus or veggie cream cheese
Deli Turkey
Finely chopped olives

Spread the tortilla evenly with a layer of hummus or cream cheese.  Top with several slices of turkey and olives.  Roll and slice.

For a link to this lunch note and countless others, click on this address for my Lunch Box Board on Pinterest...
Pinterest Lunch Box Board